Category Archives: Projects

NES Mac Classic

MacNES (15-1)

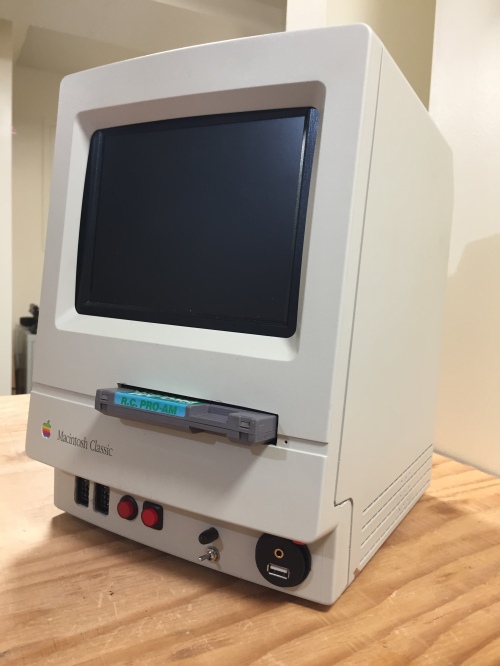
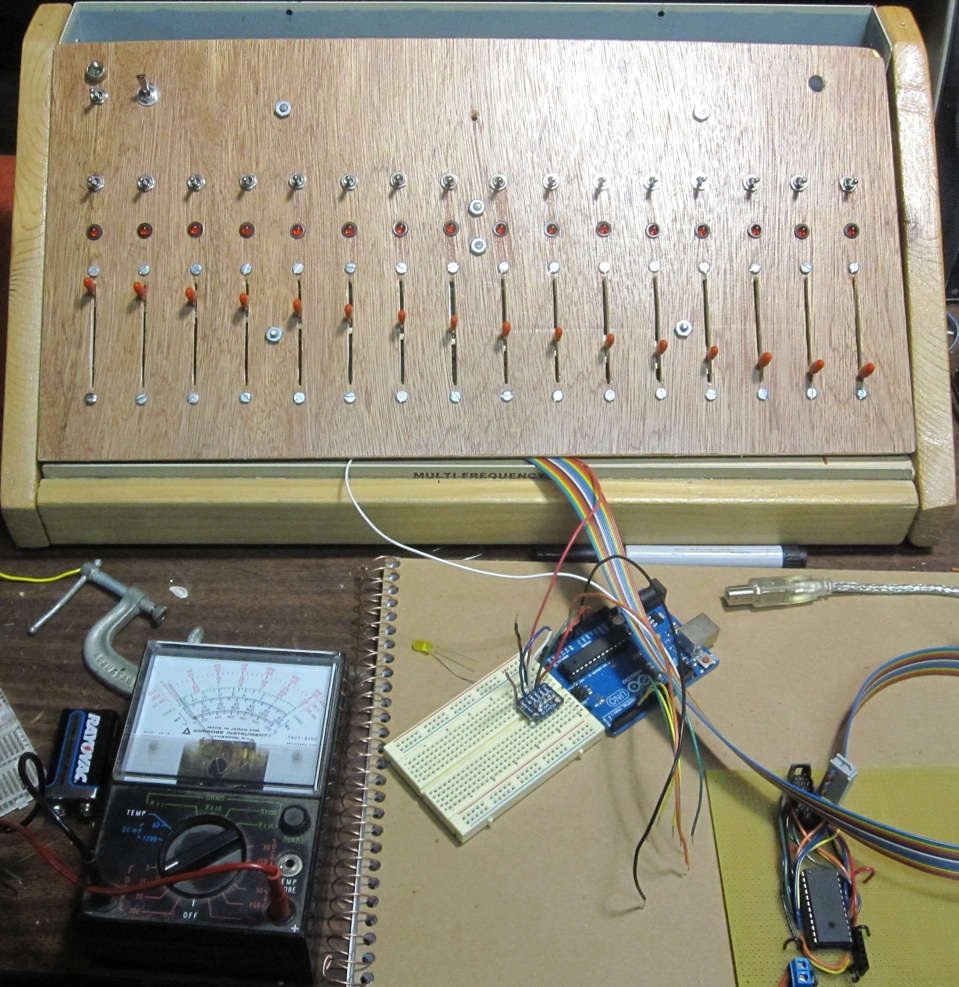
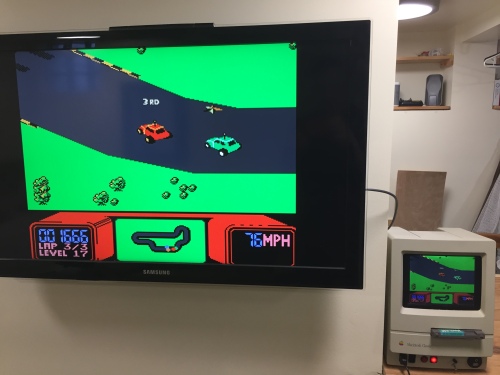
There can be no doubt that when engineers at Apple designed the Macintosh, this is what they had in mind.  Or it could be this is what I had in mind when I first saw the Vectrex. All that aside, what we have here is a NES in a Mac Classic case.  It plays original NES cartridges, accepts original NES controllers, and does so with relative portability.  There are stereo speakers, a headphone jack, and external HDMI.  There is also a USB charge port.


The constraints I gave myself were that it must fit inside the Mac Classic, it must play original NES cartridges, and it should be obvious what it is from a casual glance.  Originally, I wanted to use original NES hardware.  This proved to be unworkable given the mismatched size and orientation of the original NES.  The NES-101 seemed a better option but I just couldn’t bring myself to purchase one of these at top-dollar only to hack away at it.  In the end, I opted for a cheap NES clone, which is good because I went through three of them.  Still, it does bug me that the actual NES hardware is not a NES.  Life is full of compromises I suppose.

MacNES (20)

I wish I could elegantly describe the tortured process by which I even decided to use a NES at all.  I vacillated among various gaming hardware options all with their own challenges.  At one point, I seriously considered a Gamecube where the Mac floppy drive slot would accept the 3-inch optical discs.  I had found one article detailing the possibility of using a Wii-drive with Gamecube hardware.  But all that sounded like a lot more risk than I was willing to endure given the potential to ruin a Gamecube, which would bother me a lot.

MacNES (13)

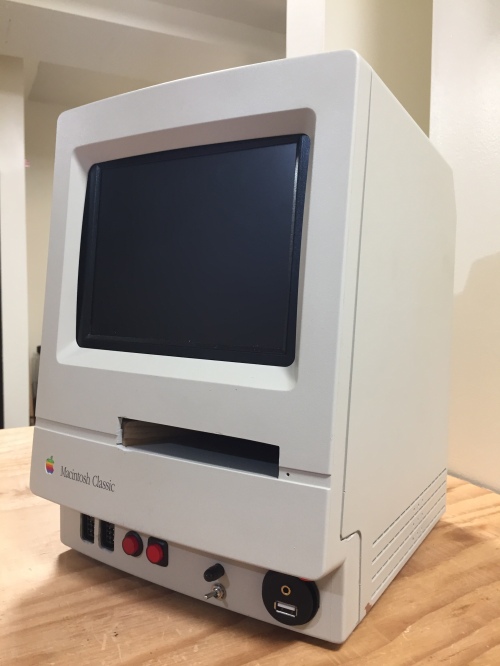
A not-so-surprising challenge was finding a TV of the right size.  It had to fit into the original Mac case, which meant it needed to have a 4:3 aspect ratio.  This is not common anymore.  In fact, it was finding a TV of this size that stirred-up this project to begin with.  Another challenge was mounting controller ports and such into the front panel with minimal evidence of fasteners.  It’s one of those self-imposed challenges that only makes sense in my head.  In this case, I tried to mimic what apple engineers do awfully well:  going to insane lengths to hide screws.

To counter the pristine elegance on the outside, I went to similar effort to do the opposite inside although maybe more out of availability rather than choice.  I used a lot of ¾” plywood throughout, which helped support various boards and such.  It also helped reinforce the whole structure, which endured a lot of stress.  At first, it really bothered me to have raw wood doing the hard work inside this project but now I find it kind of funny.

I am moderately happy with the results but can’t say I’m huge fan of most older NES titles.  Those that I like are readily available on the NES Classic or Switch anyhow.  So now that I have yet another way to enjoy older NES titles, I find myself fondly remembering building this thing more than playing the games.  Overall, I hold Apple and Nintendo in high regard with their design principles and effort to always innovate.  In some ways, it seems fitting that their retro roots could come together in such a way.

MacNES (14)

Leave a comment

Filed under Projects

Play Kitchen

Play_Kitchen_Final_1

Pretending to cook is the first step toward leaning to cook and for that one needs a pretend kitchen.  Commercially available models are either too junky or too expensive.  So I elected to make my own, which is based on the design provided by Ana White.  Construction was by far the most labor intensive but provisions were made to add electronic flourishes.  These include:

  • Lighting:  Refrigerator, Freezer, and oven were outfitted with interior lights.  All lights are controlled by reed switches to turn on when the door is open.  The oven light can also turn on/off via a push button on the front panel.

Play_Kitchen_Final_2

  • Oven Control:  A dial on the front panel is in place to control the oven.  Turning this dial past a certain point, activates a red light within the oven to simulate bake settings.

Play_Kitchen_Final_4

  • Range Burner Controls:  Left and right burners each have a dedicated knob, which illuminate a dedicated LED.  Increasing the clockwise knob turn increases the intensity of the LED
  • Alpha-Numeric Display:  Display currently only reads out the word “COOK.”  A push button changes the word to display the user’s name, which is also four letters.  Future plans for this display include a cooking timer, which will be programmed when the user can appreciate patience.

User interface is controlled by the Arduino Uno.  Relays are used to switch the 12V LED lighting.  Schematics are provided below for anyone interested.  I will note that in the end, no money was saved by building my own play kitchen but it was a labor of love.

Leave a comment

Filed under Projects

Analog Sequencer: Progress Report 1

This project has been on the chopping block for a couple years now.  I originally wanted to modify and double the step size my 8-step sequencer.  Beyond 16-steps, I wanted to add midi-clock control and slide potentiometers.  For this, I re purposed the case I had once used for a synth-hybrid project and employed the 4067 multiplexer chip.  Midi input was accomplished with a simple serial program via the Arduino UNO micro controller.  It worked well for a few weeks and then spit out random sequence patterns, which I attributed to poor wiring.  It was a troubleshooting nightmare and so it sat fro a year or more.

Since I was already using a micro controller in a very meager capacity, I opted to exploit the Arduino’s power rather than simply rebuild the original.  As I started experimenting, I soon realized I could add functionality and decrease the number of wired connections.  I continued to utilize the 4067 chips but at a minimal capacity.

So far, I’ve been able to read each slider and output a linearly scaled voltage between 0-5 volts in sequence.  I utilized the Adafruit 12-bit DAC to output the voltage and the 4067 to sequencer through the steps via 4-bit gray code binary addressing.  LED’s and gate switches are partially wired but remain unused in testing.  The next big challenge is midi-clock implementation.  Since midi clock transmits serially at 24 pulses per quarter note, the program needs to output voltage, set the next step address, and read the potentiometer in about 10 milliseconds for fast tempos.  The Arduino runs at 16 MHz but will need to be experimentally tested to see if the program can achieve this timing constraint.

Leave a comment

Filed under Projects

Analog Sequencer: Possible Design

sequencer SchematicMore to Come…

Leave a comment

Filed under Projects, Uncategorized